
How to Remove a Processor from a Loan Application
Overview
When a Processor no longer needs to be associated with a loan application — for example, due to a team change or a reassignment workflow — you can remove them directly from the Application Summary screen. This action unlinks the Processor from the file without affecting any other loan details.
This article covers how to remove a Processor using the context menu on the Processor card, and what to expect when the confirmation dialog appears.
Before You Begin
Before removing a Processor, confirm the following:
A Processor is currently assigned to the loan. If no Processor is assigned, the Remove Processor option will not be available.
You have the appropriate permissions to manage team assignments on this loan file.
If you intend to assign a new Processor immediately after, have the replacement team member ready — you can reassign right after removing.
📌 Note: Removing a Processor does not delete any data, conditions, or documents associated with the loan. It only removes the team assignment. |
Step 1 — Open the Loan Application
Navigate to the loan application from your dashboard. The Application Summary tab opens by default.
Step 2 — Locate the Processor Card
Scroll down to the Your Loan Team section. The Processor card is displayed on the right side of the team panel and will show the name of the currently assigned Processor.
Step 3 — Open the Context Menu
Click the ⋮ (three-dot) icon at the top right corner of the Processor card. A small dropdown menu will appear with two options:
Reassign Processor — use this to swap the current Processor for a different team member.
Remove Processor — use this to withdraw the Processor entirely from this loan.
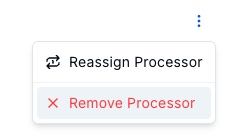
Figure 1 — The context menu on the Processor card showing the Reassign and Remove options.
Step 4 — Click "Remove Processor"
Click the Remove Processor option (shown with a red X icon). A confirmation dialog will appear asking you to verify the action before it is applied.
Step 5 — Confirm the Removal
The confirmation dialog will ask: "Are you sure you want to remove Processor?"
Click Yes, Remove to confirm and permanently unassign the Processor from the loan.
Click Cancel (or the X icon) to abort the action and return to the Application Summary without any changes.
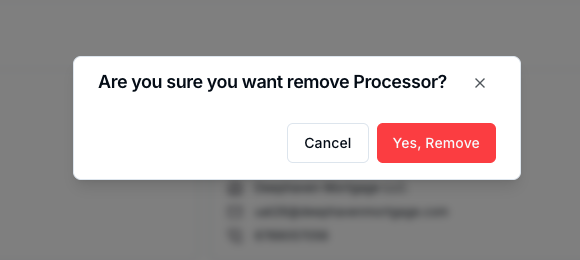
Figure 2 — The confirmation dialog that appears before the Processor is removed.
⚠️ Warning: This action cannot be undone from the portal. If the Processor is removed by mistake, you will need to reassign them using the + Assign Processor button. |
Step 6 — Verify the Change
After confirming, the Processor card will update immediately to show "No Processor assigned" along with the + Assign Processor button. This confirms the removal was successful.
What Happens After Removal
Once a Processor is removed from a loan application:
The Processor card will display "No Processor assigned".
The removed team member will no longer see this loan file in their assigned queue (depending on your portal configuration).
All documents, conditions, and loan data remain intact — no information is lost.
You can assign a new Processor at any time using the + Assign Processor button or the + icon on the Processor card.
Troubleshooting
I don't see the ⋮ menu on the Processor card
The three-dot menu only appears when a Processor is currently assigned. If the card shows "No Processor assigned", there is no Processor to remove. Verify the correct loan application is open.
The Remove Processor option is not visible in the menu
Check that your user account has the necessary permissions to manage team assignments. If the option is missing, contact your account administrator to review your access level.
I clicked Yes, Remove but the Processor is still showing
Try refreshing the page. If the Processor is still listed after a refresh, the action may not have completed successfully. Wait a moment and try again, or contact support if the issue persists.
I removed the wrong Processor by mistake
Navigate back to the Processor card and use the + Assign Processor button to reassign the correct team member. There is no "undo" for this action in the portal.
Related Articles
Understanding the Application Summary Dashboard